 Hello, it’s me! No, not Adele, silly. It’s David aka @crimsontavid here to share my most recent quilt finish!
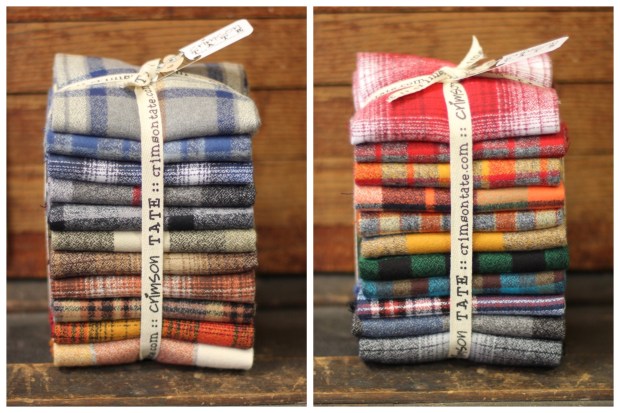
You may or may not have already seen oodles of photos of our drool-worthy Mammoth Flannel bundles. We love this stuff. Looooooove it. Truly. It’s not your typical flannel. It’s woven (not screen printed) which means it can be hard to keep track of right and wrong sides of the fabric. So choose your favorite side!
I decided the day after Thanksgiving that I wanted to WIN Christmas this year by gifting a quilt that was yet to be made. One month to finish a quilt? That’s totally doable!
FAST FORWARD through Small Business Saturday, secret sewing for Heather’s new fabric line, the Yelp Indy Totally Bazaar, a whirlwind Birthday weekend in NYC, and the Indy Men’s Chorus holiday shows (thanks to the many of you who attended and gave hugs after!!) and all of the sudden it is December 18th! Oh me oh my! My one month to start and finish a quilt turned into ONE WEEK!
But hey! Deadlines can be good! Deadlines can be GREAT! Initially, I envisioned turning these flannel fat quarters into four patches. But with the big day fast approaching, I eliminated a step from the process and proceeded with bricks instead of four patches!
Let’s call it a 3-Step Quilt! I started cutting into this project at 9:00 a.m. and was finished with the quilt top shortly after noon. I didn’t quilt it that same day (I mean I still had 5 days to finish, what’s the rush?) but if necessary, we’re betting you can grab a protein bar and make this quilt start-to-finish in under 12 hours.

@crimsontavid’s 3-Step Quilt
Wahoooo! Here’s a fast fun flannel fat quarter quilt. Say that five times fast! I made this version a lap size. If you want to make your quilt larger or smaller, you can calculate 3 blocks per fat quarter.
For a quilt finishing 63” x 72”, you’ll need:
- 19 fat quarters of Robert Kaufman Mammoth Flannel for the top
- 4-1/4 yards of Robert Kaufman Mammoth Flannel for the back (this gives you enough to match your plaid!)
- 5/8 yard of Robert Kaufman Essex Linen for the binding
- Coordinating 50wt Aurifil thread for piecing and quilting (I used the color Steampunk because my back fabric was gray and brown)
Step 1
From each fat quarter, cut (3) 5” x WOF strips

Step 2
Pair each strip with a different fabric and stitch each pair RST (that’s right sides together.) You’ll have one strip leftover! Try to get lots of variety in your combinations instead of always pairing the same two fabrics.

Step 3
After pressing seams, cut each strip set into (2) 9.5” squares.

And VOILA! Blocks are done! Happy dance!

Lay them out into 8 rows of 7 squares. Sew blocks into rows, then sew rows together. You’ll want to quilt it using your most preferred and enjoyable method! I quilted a 1/4” to the left and right of every seam, making a super simple grid – in my opinion it lets the flannel be the rockstar! Pro Tip: put that walking foot on and increase your stitch length to 3.5 or 4 when quilting these thick layers. Your stitches will be b-e-a-utiful!
Now bind this baby and get it on your bed for ultimate snuggling possibilities!


LOVE IT! Warm and cozy – pair it with a book and cup of tea! Thanks for the instructions, too! I added it to my list of projects.
Yayyy! Thank you, Nancy! A good book and a warm cup of tea?! Sounds like a great plan. -David
I love this quilt!! What batting did you use?
Thank you, Nita! I used Quilter’s Dream Cotton. So soft!!! -David
Looks great David!
Thanks Jill!
This is so fun! Way to go
Thanks Heather!! Come see us soon!! -David
I love this quilt…..Great tutorial!
Thanks so much! -David
Love this!!! How’d you quilt it?? In the ditch, all over, regular old machine or long arm???
Thanks Melanie! Regular old machine quilting, 1/4” away from both sides of every seam! It was great practice! -David
Looks awesome, David! 😍😍😍 Thanks for sharing. Does that flannel shrink much when it’s washed?
Thank you, Kim! I didn’t prewash since it’s all flannel, but I’m guessing it will shrink a bit. -David
The perfect quilt to snuggle under! I’m assuming you didn’t pre-wash the flannel? I know it can be notorious for shrinking but I’m guessing in this case it wouldn’t matter much as it would just make a washed quilt even more snuggly?
Yayy! You assume correctly – I did not prewash, but do expect a bit of shrink. Thanks, Paula! -David
Oh no! It’s these fun and quick projects that always interrupt my very calculated ufo plans! Thanks for such a fun tutorial, surely it won’t take that long.
Way to go David buddy! Never prewash either as like the “antique” look after washing later!
Please keep flannels in the store whenever possible! Thanks bunches!!
I would love the way the flannel looks. Great quality. I can feel the softness just from looking at it! I’ll definitely give flannel a try in my quilting. Thank you for the inspiration
XOXOX
I have been thinking of getting into quilting and everything looked so hard for a beginner with no real experience beside buttons and patches,, I came across your quilt and thought, hey even I can do this. So thank you for the picture and the instructions that even I can follow. Now off to the fabric store,, thanks again
Thanks for the hints re prewashing. I purchased some of this yummy flannel at QuiltCon Virtual, and since my entire quilt will be flannel, I did not prewash, per your specs. I did have one thing to deal with… I had to refold all to even out the plaids; it wasn’t bad for the yardage, as I bought a bit extra, but for the fat quarters, I lost enough to make me piece a few of the quilt square pieces along the color line to cut the pattern I was using. Visually it works, just a bit bulkier where those seams are. Tricky plaids. Is there a way to square up before fat quarters are cut?
All in all, I love the colors, the feel of this cuddly fabric. And I LOVE Crimson Tate!
Thanks again for the Champions contest. I enjoyed sharing surprises and in some cases, items to help with survival during Texas Snovid 2021. Love my medal!
I love the idea of using Essex Linen for the binding. What a nice texture contrast. I’m jumping in with my Holiday Homies flannel. XO
Love the quilt My next project
I’m from Canada. Is flannel wool? Like in kilts etc? We have flannette which is fuzzy cotton.